Raffles is now 4 years old, and working towards his debut prelim test. This program reveals all the ‘golden nuggets’ of training you need to succeed, from warming-up with beautifully balanced transitions, to achieving bend and suppleness through your horse’s whole body. Finally, put it all together and learn how to prepare for a competition.
Intro / Prelim Level
with Raffles
Follow each season with 4 year old Raffles as we reveal all the ‘golden nuggets’ of training you need.
Complete all 4 seasons to take your training to the next level!
Complete all 4 seasons to take your training to the next level!
Spring
Summer
Autumn
Winter
Spring Season
The aim of our daily training is to make our horses completely loose and supple, and working through the back. By the end of this season you will be warming up like a pro!
Our quick reference cards for each lesson will keep you and your horse on track!
Spring: Lesson 1
Stretching
- Warm-up plan
- Stretching
- Long & low
- Seeking contact
- Free walk
- Benefits of looseness
- 2nd track
- Straightness
Learn how to stretch your horse and teach them how to seek the contact.
Generally, every training session is made up of three parts like a menu: loosening up for 'starters', working for the 'main course', and then more loosening for ‘dessert’ at the end. In this first lesson, we are going to show you how to loosen your horse and teach them to stretch forward and down into the contact. But why is 'stretching' so important? The benefits are:
1. Impulsion - a horse with a supple back can step forwards energetically with his hind feet.
2. Straightness - a supple horse is able to move straight towards the rider's hands without the hindquarters swinging to the side.
3. Submission - working through the back, makes it easier for the horse to obey the aids, which makes things easier for both horse and rider.
4. When it comes to test riding, the definition of free walk is 'maximum stretch with contact' - and it is worth double marks!

Spring: Lesson 2
Sustaining Canter
- 2nd track
- Transitions
- Lightness
- Energy
- Steady contact
- Balance strap
- Bridging reins
Improve balance and teach your horse to stay in front of the leg in canter.
In dressage, it’s often said that transitions can improve everything! This lesson is hugely beneficial as we’re doing two things at once; firstly, teaching you how to ride downward transitions correctly, and secondly, your horse will learn to stay in the canter by themselves! If like Raffles, your horse drops out of canter, instead of aiding or shoving with your seat, immediately ride a downward transition to walk for 2-3 steps, then pick up the trot and canter again. The purpose of this downward transition is to:
1. Loosen the back so that he can bring his hind legs under his body
2. Strengthen the hindquarter muscles
3. Lighten the forehand and create MORE energy
Interspersing these transitions teaches your horse to take responsibility for sustaining the canter. Mentally, he will soon realise transitions are actually harder work than staying in the canter!
Spring: Lesson 3
Diamond Accuracy
- Rider accuracy
- Reducing reliance on inside rein
- Engaging inside hindleg
- Strengthening limbs
- Improved quality of paces
Diamonds are 'our best friend' for improving straightness and accuracy.
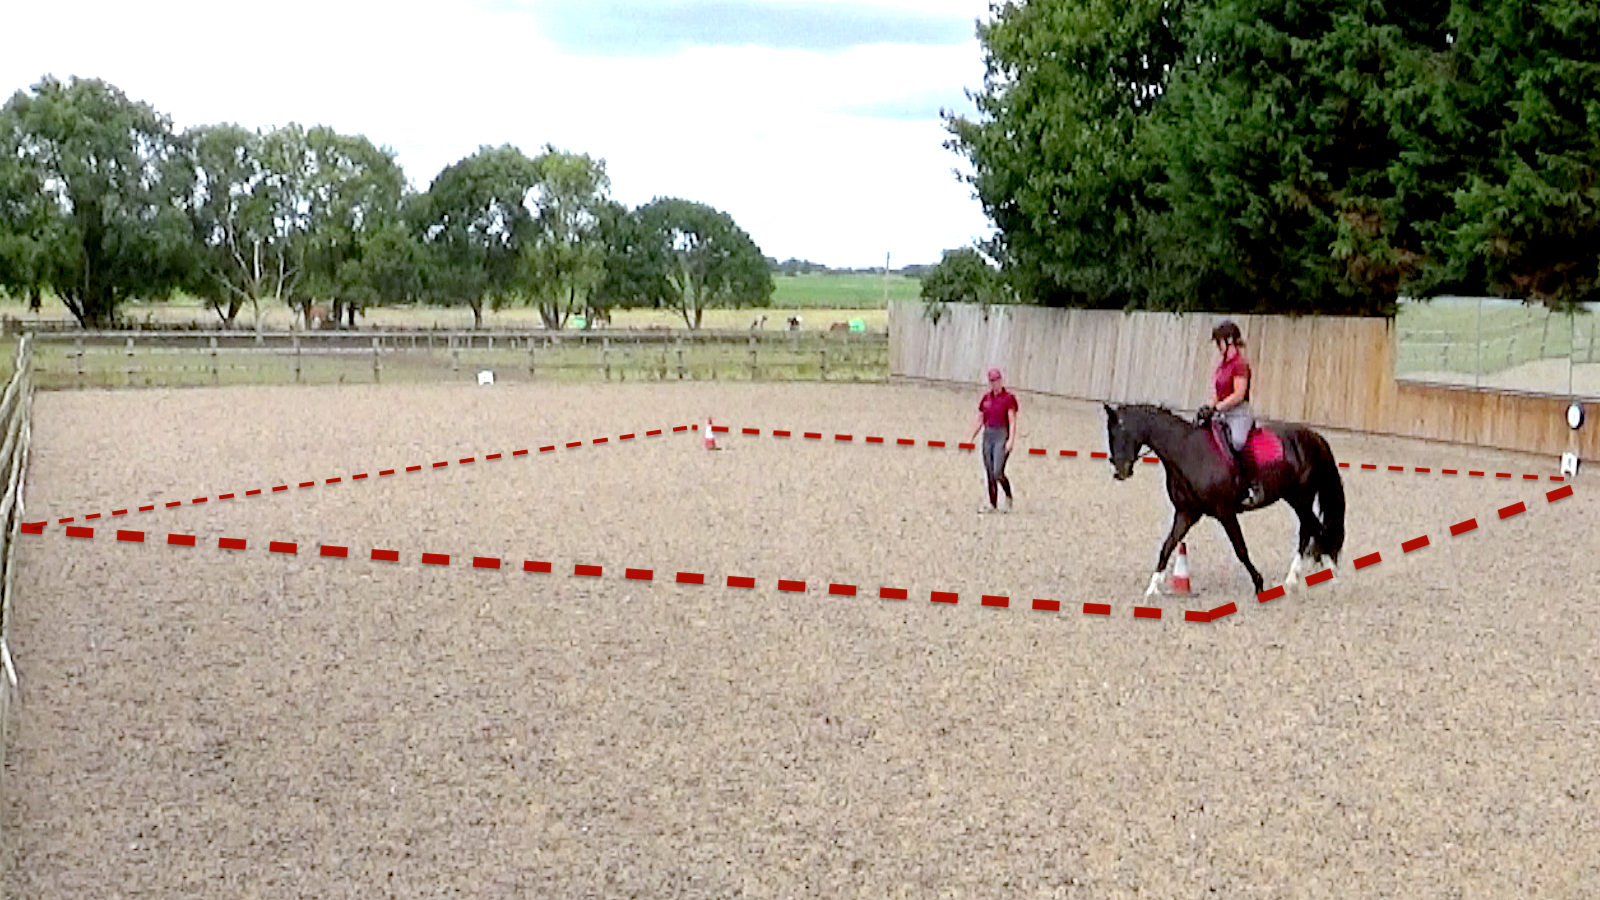
I see so many clients riding poorly executed circles, usually because the horse pushes through the outside shoulder, which then triggers the rider to use the inside rein… disaster! By mastering this exercise, you will improve your overall straightness and the accuracy and quality of your circles, instead of meandering around, with your horse falling to the inside or outside - you can’t ever cheat on the diamond! The setup can be either at the end of the arena or as we have it in the centre, using the B & E markers on the sides and then placing two cones on the centre line to make a 20m diamond shape. You will soon realise you have to be 10 times more vigilant to stay balanced and accurate on the turns at each point of the diamond, and absolutely straight on the lines between them. This pattern will teach you to set up your horse better for every movement… and get those high scores!

Spring: Lesson 4
Square Halt
- Training square halt 'in-hand'
- Parasympathetic state
- Crookedness
- Balance
Lots of easy marks up for grabs - learn how to halt square every time!
Every dressage test has at least one halt at the end of the test which is 10 whole marks - that’s a lot of marks up for grabs! We start this lesson on the ground teaching you how to train the square halt ‘in-hand’. This is something you can play with any time and it only take a few sessions for your horse to join up the dots and figure it out. Once your horse got the hang of standing square in front, you’re half way there, so then we do exactly the same with the hinds. We can then start the same process under saddle. The key to a good square halt is your horse’s balance. If he is loading one shoulder or is slightly crooked, the chances are your halt will not be square. So we start on the track using the fence to help us in the beginning. A pair of eyes on the ground or a mirror is useful, or you might just need to LOOK and see what’s happening... just make sure you then sit up tall and your weight is even on both sides!
Downloadable Quick-Reference Cards
Spring: Lesson 1 Stretching
Grab a friend! Take it in turns to play ‘hotter’ or ‘colder’ to get the feeling of taking the bit forward and down and keeping a consistent contact.

Place 4 cones on the short ends of the arena 2m in from the corners to mark out the ‘2nd track'.

Starting in walk, raise the bit upwards into the corners of your horse’s mouth so there is a consistent pressure.

‘Follow’ the contact as your horse takes the bit forward and down. Ease the pressure slightly as your horse stretches - so this becomes a ‘sweet spot’.

Next progress to trot. Be quick to bend your elbows to follow the contact if your horse raises their head. Repeat on both reins equally.
REMEMBER:
Pay attention to the quality of each pace. Make sure you have plenty of impulsion before you ask your horse to stretch.
Pay attention to the quality of each pace. Make sure you have plenty of impulsion before you ask your horse to stretch.
- Spring

Summer Season
In this season we work on the key ingredients for transitions. Learn how to get the feeling of 'connection' so that your transitions become beautifully balanced and in an outline!
Our quick reference cards for each lesson will keep you and your horse on track!

Summer: Lesson 1
Reaction and Impulsion
- Rapid transitions
- Reaction
- Impulsion
- Sharpening up aids
- Rider preparation
This lesson will instantly transform your horse. Take a breath and count to 10!
So what makes a good upward transition?
1. Reaction - first of all, your horse must react instantly to your aids.
2. Impulsion - the transition should not “dwell.” In other words, the horse should immediately move forward into the new pace. But the BIG ONE, which I see clients struggling with the most is
3. Balance and frame - in a good upward transition the horse should maintain a round outline, and at the same time step under with the inside hind leg, so the transition is uphill and balanced. But what we often see is the horse hollowing or falling onto the forehand.
In this lesson we use an exercise called '10’s', making rapid transitions between trot and canter counting exactly 10 strides in between each transition. Our focus is all about the reaction to your aids which must be instant and also your rider preparation. This exercise is really going to sharpen up both you and your horse!

Summer: Lesson 2
Turn on the Fore
- Training turn on the fore in-hand
- Riding turn on the fore from halt
- Transitions
- Connection
- Balance
This is the key to understanding the role of the inside leg and outside rein.
'Turn on the fore' is so important - but not used often enough! So what is it and why is it important? It’s where your horse steps the hind end around the fore to face in the opposite direction. The benefits are:
1. Suppleness - crossing the hind legs helps to loosen the back.
2. Straightness - you can un-contract the muscles on the horses’ stiff side to make them straight.
3. Submission - it gets the horse focused on the rider.
4. Engagement - the horse has to engage the hind lifting the back and the thoracic sling. But the as a trainer the most important benefit is:
5. Connection - as it educates both the horse and the rider about the role of the inside leg and the outside rein. For me, 'turn on the fore' is the key to demystifying the whole concept of ‘inside leg to outside rein’.
This lesson will completely transform the quality of your riding!

Summer: Lesson 3
Connection
- Connection
- 'Travelling' turn on the fore in walk
- Rider preparation
- Yielding steps
- Engagement
- Balance
Learn to 'feel' the connection to ride beautifully balanced transitions.
In the previous lesson, we learned how to 'turn on the fore' and how to 'feel' the inside hind leg stepping under and connecting to the outside rein. The next step is a ‘traveling turn on the fore’ this time on a 20m circle in walk. Using the same aids for the 'turn on the fore' we ask the inside hind leg to step under - just one or two steps - whilst traveling on the circle. The aim is to try to tap into that 'connected feeling'.
Once you’ve got the first part, the next step is to add a transition to trot on the opposite side of the circle, then come back to walk and repeat. Now here comes the magic! Each time we bring the transition closer and closer on the circle to the 'turn on the fore'. Your horse will start to anticipate and mix the two parts together - so we end up with the transition to trot overlapping the 'turn on the fore'. As your horse steps under you’ll feel the connection in the outside rein and you’ll be set up for a beautifully balanced transition to trot in an outline.

Summer: Lesson 4
Uphill Canter Transition
- Connection
- 'Travelling' turn on the fore in trot
- Rider preparation
- Canter transition
- Uphill
- Balanced
- Outline
By the end of this lesson you will be amazed by the improvement!
Now we're ready to progress to the canter transition. This time we progress to 'traveling turn on the fore' in trot. We use the same aids as before; flex to the inside, slow the front legs down with the outside rein, and ask the inside hind leg to step under - just one or two steps - aiming to get that beautiful 'connected feeling', before straightening back out onto the circle.
Once we get the right feeling of connection in the first part, we can start to add in the canter transition. We need to allow a bit more time to get organised than we did for the walk/trot transitions, so stay in the canter for at least a whole circle before repeating the trot transition. We then start to bring the canter transition closer and closer to the trot 'turn on the fore' steps so again, your horse starts to anticipate and overlap the two parts. If like Raffles, your horse tends to hollow into the canter transition, by the end of this lesson you will be amazed by the improvement!
Downloadable Quick-Reference Cards
Summer: Lesson 1 Reaction and Impulsion

Start in rising trot on a 20m circle. Don’t be too picky about the size or the shape for now - this lesson is all about sharpening up your reactions!

Count 10 strides and when you get to 5 start to prepare, so your transition (either upward to canter or downward to trot) is precisely on the count of 10!

Canter transition aids: sitting trot, sit tall, slightly raise your inside rein, inside leg at the girth, outside leg behind the girth for the strike off .

Trot transition aids: both legs on, sit tall, stop following the canter with your seat, close the reins with your fingers, into sitting trot.

This lesson is quite intense so only do a few reps to begin with. In between each rep, stretch and walk away from the area of ‘pressure’.
REMEMBER:
Ideally your horse should react to a light leg aid. If they don’t respond, use the whip to tap behind your leg - not as punishment, but as a reminder.
Ideally your horse should react to a light leg aid. If they don’t respond, use the whip to tap behind your leg - not as punishment, but as a reminder.
- Summer
Autumn Season
Does your horse need more suppleness? In this season you will become aware of what is happening under the saddle as you learn to create bend through your horse's whole body.
Our quick reference cards for each lesson will keep you and your horse on track!

Autumn: Lesson 1
Creating Bend
- Bending aids
- Shifting spine
- Inside seat bone
- Developing 'feel'
- Focusing on the 'symptom' rather than the underlying problem
Creating bend is like an 'onboard' physio session for your horse!
In this lesson we teach Raffles how to shift his spine and bend his body from his pole all the way through his body to his tail. As a rider, it is important to learn to ‘feel’ when your horse has really ‘let you in’ to their body and truly bending around your leg. By teaching you how to ‘feel’ your way through this exercise, you will learn how to really ‘soften’ your horse and help them to ‘let go’ in their body - it’s like an onboard physio session for your horse!
When I begin teaching a new horse and rider combination, I always want to know about their strengths and weaknesses. What I’ve learned over time is that the rider usually talks about a 'symptom', rather than the deeper underlying 'problem'. For example, they might have a contact issue, heaviness in one rein, or head tilting. They then might cover up the 'symptom' with a different bit, or side reins, or some other gadget. But the real underlying issue usually comes down to a lack of lateral suppleness!

Autumn: Lesson 2
Change of Bend
- Change of bend
- Shifting spine
- Developing rider 'feel'
- Inside seat bone
- Horse and rider skeleton
- Subtle aids
Learn how your skeleton, and your horse's skeleton both fit together.
By now you will have realised my approach is to think 'outside the box' and I will always aim to do everything I possibly can to find ways to help you get the right 'feeling' in your riding. If you can find these lessons by searching google or in a dressage textbook then I really haven’t done my job! In the previous lesson, we learned how to create bend on each rein separately. As the rider, you will have learned to 'feel' your inside seat bone sink downwards as your horse shifts the spine and bends around your leg.
Now the next stage is to see if we can change the bend, on a figure of 8, changing from one rein to the other. This lesson is all about figuring out how your 'skeleton' as the rider fits together with your horse's 'skeleton', and gradually learning how subtle you can be with your aids. By the end, the picture will start to look much more light and harmonious - which is what dressage riding is all about!

Autumn: Lesson 3
Canter Bend
- Creating bend in canter
- Subtle bending aids
- Secure established canter
- Rider posture
- Confidence
Be brave! Learn how to get better control of your rider posture.
Raffles is already looking much more supple in the trot as the lateral bend is developing beautifully - so we’re now ready to start working on creating bend in canter. Before we get started there are a few pre-requisites to this exercise, firstly you need to have your horse be able to sustain the canter by himself. Your job is not to keep reminding him to stay in canter - as you will have already learned in the Spring season that’s your horse’s job!
Once you have established a good secure canter, you can then start to bend your horse's body, just as we did in the trot. Now for some of you, we’re putting you on the edge of your comfort zone here, but just try to go with it… moving around whilst you are in canter takes some bravery, but if you allow yourself to experiment and test yourself, you are going to learn to ultimately get better control of your own rider posture which is absolutely essential!

Autumn: Lesson 4
Counter Bend
- Canter balance
- Shallow loop
- Counter bend
- Straightness
- Uphill canter
Help your horse become more 'uphill' and beautifully balanced in canter.
In our final lesson this season we start to develop more uphill balance in the canter. Raffles already knows that there is a 'left lead' canter and a 'right lead' canter. At the moment, he is balancing his weight over his leading leg and shoulder in the canter. But as our training progresses, he will need to learn to carry his weight more evenly, so to do this we going to start introducing a slight 'counter bend' in canter. We will be working on a shallow loop, so instead of traveling down the long side of the arena, Raffles will be coming in off the track in the corner, onto a gentle curve, and then back out to the corner again and the other end.
As the lesson progresses you will see Raffles' body will straighten and slightly counter-bend on the loops. At that point, he will start to get the idea that he can shift his weight and move his balance in the canter, and you as the rider will feel your horse’s body become more 'uphill' which is a fantastic feeling!
Downloadable Quick-Reference Cards
Autumn: Lesson 1 Creating Bend

In this lesson you will learn how to shift your horse’s spine and create bend from poll to tail. You will need a cone placed in the centre of the arena.

Start left rein in walk on a 15m circle around the cone. Keep your inside hand ‘open’ towards your knee. Then bend your horse’s neck to look at your left toe.

At the same time, you bend around and look at your horse’s inside hind leg. So ‘every body look left’. Repeat several times in walk and then trot.

Change rein and repeat - ‘everybody look right’. Allow enough length in the outside rein for your horse’s neck to bend towards your right toe.

Focus on the ‘feeling’ when your horse ‘let’s you in’. The barrel will shift to the outside, allowing space for your inside leg and seat bone to sink downward.
REMEMBER:
Lack of suppleness is the root cause of many problems. In your riding, think about solving the ‘problem’, rather than covering up the ‘symptom’.
Lack of suppleness is the root cause of many problems. In your riding, think about solving the ‘problem’, rather than covering up the ‘symptom’.
- Autumn
Winter Season
It is time to start putting all our training to the test! Learn how to present each sequence to impress the judge and gain the best possible marks at a competition. Good luck everyone!
Our quick reference cards for each lesson will keep you and your horse on track!

Winter: Lesson 1
Forward Connection
- Give and take inside rein
- Riding from 'back to front'
- Connection
- Channeling energy
- Entering the arena
- First impression
Learn to ride your horse from 'back to front' with a trusty wheelbarrow!
We start this season on the ground… with our trusty wheelbarrow! Why? Well, as we all know, as riders, we are never supposed to pull back on the reins - what we are supposed to do is ‘push our hands forward’ towards the bit. Now this concept of a ‘forward hand’ or ‘riding your horse from back to front’ confuses a lot of riders. They think ’well how can I push my hand forward and still have contact!?'
In this lesson, we will use the wheelbarrow to help explain it and give you the right feeling. If we remember our 'Scales of Training', which is like our ‘dressage bible', the horse should be in ‘alignment’, when moving around a circle or through a turn, so the hind follows the front. The idea is to ‘channel the energy’ from the hind legs into your hands, and then forward to the bit. So… you are moving forward, as a whole ‘unit’ on two tracks. You need to keep your hands pushing forward or your wheelbarrow will stop!

Winter: Lesson 2
Ring Craft
- Center line
- Pulling on inside rein
- Shoulder control
- Trot test sequence
- 20m circles
- Balance
- Rhythm
- Flow
Learn to prepare for each and every line to get the best possible marks.
The first point where we often see lots of wobbles is at the end of the centre line. It can be anything from the rider forgetting which direction they are going at C, loss of rhythm, or the big one - which we’ve already been working on it this season - pulling on the inside rein which causes the horse to fall out through the shoulder. Now this is the worst possible place you can make this mistake because you are right in front of the judge! If you pull on the inside rein and lose control of the outside shoulder you will end up with a bulge at the end of the centre line, which will give the judge a bad first impression.
In this lesson we learn how to apply 'shoulder control' throughout the trot sequence, starting with the centre line, and then onto basic figures such as 20m circles and diagonal lines. By the end of this lesson, your trot work will be beautifully balanced, in a rhythm, and earning the best possible marks from the judge!

Winter: Lesson 3
Canter Control
- Transitions
- Outside aids
- Turning the shoulder
- Creating bend
- Give and re-take inside rein
- 20m circle
- Arena geography
Mystery solved! Learn how NOT to ride square or odd shaped circles.
A really common problem, especially on the left rein, is that the shoulders drift out so the circle becomes too big. In this lesson, you will learn how to prevent this from happening. To start with, imagine our diamond again (remember we learned this in season 1?) There are 4 sections of the circle, each with a point in between. At each point think ‘turn the shoulders’, then once you’ve turned, in the next quarter of the circle think ‘create the bend’ (this is in season 3) so you are continually alternating between the two.
At first, you might find the 'points' are coming up too quickly but don’t worry, just miss one out and try again at the next point. Even if you are just 'thinking' about 'turning the shoulders' - this is a really big step forward. When you feel you have got the circle under control, we can progress and try to ‘give and re-take' the inside rein as you cross the centre line. Use this to check you aren't relying on the inside rein to turn!

Winter: Lesson 4
Free Walk
- Maintaining contact
- Rowing the boat
- Overtrack
- Transition to medium walk
- Turn on fore
- Final test
Imagine your horse walking like a panther - not a cat on a hot tin roof!
This final lesson is really important because it is all about the walk. The free walk ‘should’ be marching along with lots of energy, with your horse using their back and neck… so as the rider you need to move your body to follow that movement. By that we mean your hips, shoulders, elbows, forearms, and hands… all moving!
Most riders already know that the hips need to move so they don’t stiffen and block the horse’s back, but if you’ve constantly been told to keep your hands still, this can be misunderstood when it comes to the walk, because if you don’t ‘move your hands’ and follow the movement, then the horse will not feel free to lengthen and walk through the whole body. Now we're finally ready to put all of our training to the test, so let's see how they get on out at a competition. Good Luck Maz & Raffles!
Downloadable Quick-Reference Cards
Winter: Lesson 1 Forward Connection

Start this lesson on the ground... with your trusty wheel barrow! This will give you the ‘feeling’ of pushing your hands forward when you ride.

At the ‘A’ end of the arena, spiral down from 20m, 15m to 10m into the corner, and then down the centre line. Remember this feeling when you ride!

Next place a cone in the corner and ride the same pattern in trot, using your outside turning aids. Test yourself by ‘giving and retaking’ the inside rein.

Focus on ‘channeling your energy’ forward around each circle, with your horse in the correct alignment ie. the hind legs following the front, on two tracks.

Finally, once you have established ‘alignment’ on the 10m circle, turn onto centre line. Focus on the feeling of ‘forward connection’. Repeat on both reins.
REMEMBER:
Riders often draw into themselves and ride with a ‘backward hand’ when they are nervous in a test. Think of the wheelbarrow - channel your energy forward!
Riders often draw into themselves and ride with a ‘backward hand’ when they are nervous in a test. Think of the wheelbarrow - channel your energy forward!
- Winter